Pages

Showing posts with label diy. Show all posts

Wednesday, May 7, 2014

DIY ~ Cupcake Bath Bombs

cupcake bath bomb
Warm bath + cupcakes – guilt. Now that’s an equation anyone can love!
Although these cupcakes look good enough to devour, they are  DIY Cupcake Bath Bombs that will add fizz, fragrance and moisturizer to your bath water. We think they make perfect wedding shower favors – especially for a spa-themed bridal shower, so we are going to teach you how to make them.
 bath bomb cupcakes
Ingredients for DIY Cupcake Bath Bombs (Adapted from Little Birdie Secrets Bath Bomb Fizzy Recipe. )
Makes 11-12 cupcakes.
For the cupcake you will need:
  • 1 cup. baking soda
  • 1 cup Citric Acid
  • 1 Tbsp. oil (We  used Sweet Almond Oil, but you can also use grapeseed oil or olive oil)
  • 5 drops fragrance/essential oil (we used lavender essential oil)
  • 3-5 drops coloring or Pigment powder (You can use food coloring, but we used soap colorant or Pigment powder)
  • Witch hazel (poured into a spray bottle)
  • Colored sugar or sprinkles
  • Paper cupcake liners
  • cupcake pan
For the icing you will need:
  • 3 Tbsp. meringue powder
  • 1 lb. (measured by weight) powdered sugar
  • 1/4 tsp. Cream of Tartar
  • 5-6 Tbsp. warm water
  • Few drops of color or Pigment powder or soap colorant
  • Few drops essential or fragrance oil
  • colored sugar
  • Glass bowl
  • Hand mixer
  • pastry bag
  • Large tip for pastry bag
Place cupcake liners in cupcake pan. Place all dry ingredients in a bowl and give it a stir.

bath bomb diy cupcake
Pour sweet almond oil, essential oil or fragrance oil and color into a small bowl and stir. Add mixture to dry ingredients and stir.
bath bomb cupcake
Spray mixture with witch hazel. Mix with your hands. Keep spraying and mixing until the mixture feels like wet sand. When it’s ready, the mixture should clump together so that you can form a ball. That said, be careful not to get the mixture too wet because too much moisture could activate the citric acid, ruining your bath bomb.
diy cupcake
Add mixture to cupcake liners. Fill about 2/3 full. Press down with fingers. Set aside for 10 minutes, then remove from cupcake pan.
recipe bath bombs
Now it’s time to make the frosting. Mix meringue powder with warm water in a glass or ceramic bowl. Add cream of tartar and color.
cupcake bath bomb
Add powdered sugar. Using a hand mixer, blend on high setting. If your mixture feels too stiff, add another tablespoon of water. Beat for 7-9 minutes. Icing is done when it forms stiff peaks and is thick like, well, frosting. Place inside a pastry bag.
recipe-cupcake-bath-bomb
Carefully frost your cupcakes.  Once the cupcakes are frosted, add colored sugar or sprinkles.
recipe cupcake bath
Aren’t they lovely?
cupcake bath
If you are giving these as bridal shower favors, wrap them in cellophane bags or small boxes and add tags. This is how they look when they are unwrapped:

Tuesday, May 6, 2014

DIY ~ Wedding Cake: Triple Chocolate

Let's get out of the norm and try a triple chocolate wedding cake instead of all the white ones!


Ingredients:
1 1/2 cups self-raising flour
1/2 cup plain flour
1/2 cup cocoa powder
250g (9 oz) butter, chopped
1 tablespoon oil (not olive oil)
200g (7 oz) dark chocolate, chopped
1 1/2 cups caster sugar
1 tablespoon instant coffee powder
2 eggs, lightly beaten
Chocolate Fudge Frosting:
90g (3 oz) butter
1/3 cup water
1/2 cup caster sugar
1 1/2 cups icing sugar mix
1/3 cup cocoa powder
1. Preheat oven to 160 Celsius (315 Fahrenheit). Grease a 20 cm (8″) round springform cake tin and line with baking paper.
2. Sift flours and cocoa powder into a mixing bowl.
3. In a saucepan, combine butter, chocolate, oil, sugar and coffee powder with 1 cup of water. Stir over low heat until the chocolate has melted and become smooth. Let cool for about 10 minutes.
4. Add the chocolate mixture to the flours and whisk until just combined.
5. Add the eggs one at a time and mix well.
6. Pour into the prepared cake tin (one with straight sides like a springform tin) and bake for 1 1/2 hours or until the skewer comes out just clean. Let cool completely in the tin.
7. Once cool, cut the top so that it’s flat then turn onto a plate (the bottom is now the top!)
To make the frosting:
1. Combine butter, water and caster sugar in a small pan, stir over heat without boiling until the sugar is dissolved.
2. Sift the icing sugar and cocoa into a medium bowl. Stir in the hot butter mixture in batches.
3. Cover, refrigerate for one hour or until thickened then beat until spreadable.


To assemble, make sure you use only a small amount of frosting in between layers and coat your cake only when cooled. Use a hot knife to smooth the surface if that is what you want to achieve.


Monday, May 5, 2014

DIY ~ Blooming Fonts

Write any message or any name you want with amazing blooming fonts and give the most ingenious gift ever to the people you love.


Follow this simple tutorial:


What You Need :

  • paper mache letters (there are 8″ and 12″)
  •  exacto knife
  • floral foam
  • glue gun
  • wire cutters or strong scissors
  • silk flowers


How To Make :
1] Using an exacto knife, cut off the front of the letters and hollow out carefully.
2] Cut floral foam into shapes that fit letter and secure with glue
3] Trim the silk blooms off, leaving a short stem, and position into the foam. You can reinforce with glue, if necessary.
4] Arrange happily!


DIY ~ Amazing Candle Craft Ideas

Everyone loves candles, especially when they come in amazing and inspiring looking vases. This is a very easy and fast tutorial on how to create your own unique candle jars that you can decorate any way you want. They make an excellent gift for any occasion for yourself or anyone you love.


Visit us on: www.mymisi.com and browse around more amazing gifts! 


Tuesday, April 29, 2014

DIY ~ Thread Wrapped Love Necklace for Mother's Day

Make this amazing Thread Wrapped Love Necklace for Mother's Day. It's amazingly easy and fun.  The supplies are also pretty basic, If you're an avid DIY'er, there's a good chance you have everything on hand!


Supplies:

- Craft wire (I used 24 gauge)
- Embroidery thread, one skein
- Scissors
- Round nosed jewelry pliers
- Chain (length is up to you)
- Clear nail polish (you'll use this in more than one way!)
- Jump rings and jewelry clasp (optional)
- Charm or tassel (optional, not shown)
- Ruler (not shown)


1) Cut a length of wire. About 10 or so inches should be enough. Using the round nosed jewelry pliers, create a loop at one end of the wire.


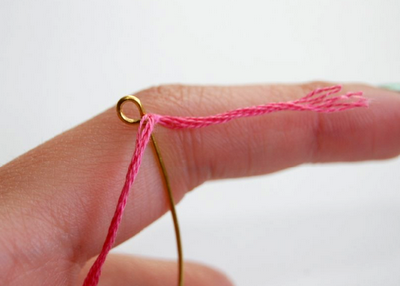
2) Keeping the skein of thread in tact/in the packaging (this makes it easier to work with), tightly tie the thread near the loop you just made. Triple or quadruple tie it for extra security.


3) Begin tightly wrapping the thread around the wire. I found that it was easier to do this if you hold the entire skein of thread in one hand while wrapping. Be sure to wrap the thread as tight as possible. 


4) Continue wrapping the thread, until you've reached about 9 (or so) inches of wrapped wire.


5) Tightly triple or quadruple knot the thread.


6) Cut off the excess thread, and secure the knot with clear nail polish. Let dry


7) Cut off the excess wire, leaving about half an inch. Use the pliers to create a loop, just like you did earlier.


8) Go back to the end that you started with, and cut off the excess thread. Secure with clear nail polish and let dry.


9) Start creating the "L" at one end. Bend the wire to the left, like the first picture above. Wrap the wire back over to the right, around the pliers as shown above. This will create the bottom portion of the L. 


10) To make the "O", wrap the wire around the cap of the nail polish bottle. This will help guide the general shape. Remove the bottle and mold the "O" as you wish.


11) After you're done with the "O", make the sure the wire is bending up, like the first picture above. Sharply bend it back down to begin the "V". Tighten the sharp bend by squeezing it with the pliers.


12) Bend the wire back up, then horizontally. This will create the "V". 


13) Wrap the wire around and over the pliers for the "e".


14) Bend the wire back up to complete the last letter.


15) Attach the chain to both ends. You can either use jump rings, or simply open up the loops with the pliers. You can also attach the chain to one end of the pendant, so that it hangs differently. It's totally up to you.


16) Attach a charm or tassel, if you'd like. 


Pretty easy! With some practice and playing around, you can create other words as well. 


Thursday, April 3, 2014

DIY ~ Easter Craft: What to Do With Those Plastic Eggs


I got out my Easter bins a few days ago. Why is it that I always think I have way more cute holiday decorations than I actually do – lol? What I discovered is that I have approximately 5 million of those cheap, plastic Easter eggs.

So I decided to do something with some of them. I took my leftover fabric scraps and decoupaged the eggs. So if you’re like me with a million of those eggs, take some of them and transform them into something that you actually want to keep!

This is what I did:
First take your eggs and apply some glue to keep them closed. I used super glue.
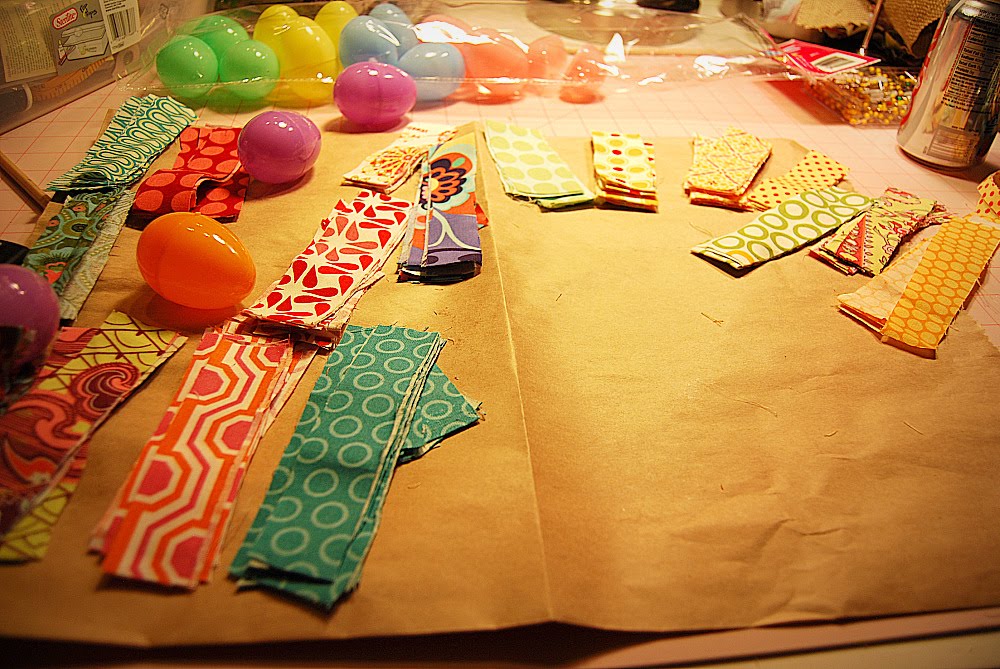
Then take your fabric and cut it into small strips. It depends on how big your eggs are, I cut mine in 1 inch x 4 inch strips. Then I made some cuts around the edges of the material — this will make the material mold to the egg’s shape much better. To save time I cut about 6 layers of material at once into strips, then took all six layers and made cuts in the sides of the strips. I cut some of the strips in half – 1 x 2 inches to fill in gaps at the end.
{Note: I used a bristle paintbrush to do this — actually a stenciling brush. I found that if you use a brush with bristles, you can apply pressure at the end and smooth out wrinkles and air bubbles.}
Apply a coat of decoupage medium to the back side of the first strip, not directly onto the egg. Now lay the first strip onto the middle of the egg, right over the opening. Smooth it down with your fingers. Don’t put any decoupage medium on the outside of the fabric until the whole egg is covered. This will cut down on having your hands covered in Mod Podge. I also kept a damp washcloth right next to me. After each egg I wiped my hands off. 

Now apply the next strip of material, making sure to cover the back of the fabric in decoupage medium. I applied the strips to the naked parts of the egg first and then covered up the holes at the end. 

Once the whole egg is covered, smooth down the wrinkles. NOTE: your egg is going to have wrinkles, you are just trying to make it as smooth as possible. 

Then add a thick layer of decoupage medium over the whole egg and lay it on wax paper to dry.


Tuesday, April 1, 2014

CREATIVE WAYS TO DYE EASTER EGGS

Hop to it! These pretty Easter egg dyeing techniques are perfect for the kid in you. These dyeing and decorating ideas, including pretty egg coloring ideas and embellishments you can create with crafts supplies, ensure you'll have a very happy Easter.

Drizzled Easter Eggs


To make these swirled Easter eggs, simply pick a few complementary colors and get started! Drizzle egg with rubber cement, let dry, then dip in a dish of dye. When dry, gently peel off the rubber cement. Repeat two (or even three!) times with additional colors.

Chirping Chick Easter Eggs

These so-cute (and so-creative) Easter egg chicks are surprisingly easy to make. Dye white eggs canary-yellow, let dry, and glue a quill feather to the top. Cut out a beak from orange construction paper and glue it on. Use a marker to make two dots for eyes and place your feathered friend in a piece of cracked eggshell set in a nest of raffia.

Natural-Dyed Easter Eggs

For a fresh take on dying your Easter eggs, go all-natural! These Easter egg dye recipes are all food or plant-based and create beautifully subdued shades. Just simmer beets, blueberries, or other natural ingredients in a cup of water with a dash of vinegar to create the colors. Leave eggs soaking in the dye in the refrigerator overnight for the richest colors; just a few minutes will work for more subdued variations.

Metallic-Dipped Easter Eggs

We love the way golds and silvers add a sophisticated touch to even the simplest of decorations. To make this Easter egg design, turn to metallic-hue paint pens after dying your eggs. Simply draw whatever suits you, from polka dots to stripes to a dip-dyed effect.

(Better homes)