Pages

Monday, May 5, 2014

DIY ~ Amazing Candle Craft Ideas

Everyone loves candles, especially when they come in amazing and inspiring looking vases. This is a very easy and fast tutorial on how to create your own unique candle jars that you can decorate any way you want. They make an excellent gift for any occasion for yourself or anyone you love.


Visit us on: www.mymisi.com and browse around more amazing gifts! 


How to Use the Chatlr Application for Tumblr

Ever wanted to chat on Tumblr in a way that's more private than reblogging text posts and more effective than simply messaging back and forth? While there is no integrated chat feature for your tumblelog, there is a chatroom-like Tumblr application known as Chatlr. By following the instructions in this article, you'll learn how to set up and use Chatlr
  1. Use the Chatlr Application for Tumblr Step 1.jpg
    Log in to Tumblr using the email and password associated with your account.
    Then go on to Chatlr.com.

  2. Use the Chatlr Application for Tumblr Step 2.jpg

    You will be redirected to a Tumblr URL. Click the “Allow” button to allow the Chatlr application access to your Tumblr account.
  3. Use the Chatlr Application for Tumblr Step 3.jpg

    You will be taken directly to the main Tumblr chat screen. Choose or create a room to chat in the bottom left corner.
  4. Use the Chatlr Application for Tumblr Step 4.jpg

    Type your messages in the text input field along the bottom of the screen. Send them by hitting “Enter” on your keyboard.
  5. Use the Chatlr Application for Tumblr Step 5.jpg

    Your messages and messages from others are shown the large panel on the right.
    You can publish chat posts consisting of these messages by clicking the on “Chat” icon at the top of your Tumblr dashboard.

Tuesday, April 29, 2014

DIY ~ Thread Wrapped Love Necklace for Mother's Day

Make this amazing Thread Wrapped Love Necklace for Mother's Day. It's amazingly easy and fun.  The supplies are also pretty basic, If you're an avid DIY'er, there's a good chance you have everything on hand!


Supplies:

- Craft wire (I used 24 gauge)
- Embroidery thread, one skein
- Scissors
- Round nosed jewelry pliers
- Chain (length is up to you)
- Clear nail polish (you'll use this in more than one way!)
- Jump rings and jewelry clasp (optional)
- Charm or tassel (optional, not shown)
- Ruler (not shown)


1) Cut a length of wire. About 10 or so inches should be enough. Using the round nosed jewelry pliers, create a loop at one end of the wire.


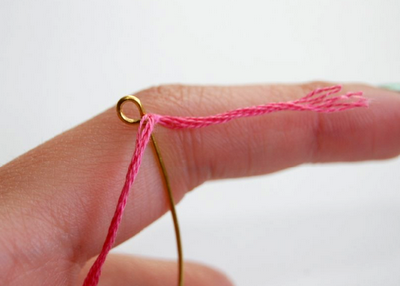
2) Keeping the skein of thread in tact/in the packaging (this makes it easier to work with), tightly tie the thread near the loop you just made. Triple or quadruple tie it for extra security.


3) Begin tightly wrapping the thread around the wire. I found that it was easier to do this if you hold the entire skein of thread in one hand while wrapping. Be sure to wrap the thread as tight as possible. 


4) Continue wrapping the thread, until you've reached about 9 (or so) inches of wrapped wire.


5) Tightly triple or quadruple knot the thread.


6) Cut off the excess thread, and secure the knot with clear nail polish. Let dry


7) Cut off the excess wire, leaving about half an inch. Use the pliers to create a loop, just like you did earlier.


8) Go back to the end that you started with, and cut off the excess thread. Secure with clear nail polish and let dry.


9) Start creating the "L" at one end. Bend the wire to the left, like the first picture above. Wrap the wire back over to the right, around the pliers as shown above. This will create the bottom portion of the L. 


10) To make the "O", wrap the wire around the cap of the nail polish bottle. This will help guide the general shape. Remove the bottle and mold the "O" as you wish.


11) After you're done with the "O", make the sure the wire is bending up, like the first picture above. Sharply bend it back down to begin the "V". Tighten the sharp bend by squeezing it with the pliers.


12) Bend the wire back up, then horizontally. This will create the "V". 


13) Wrap the wire around and over the pliers for the "e".


14) Bend the wire back up to complete the last letter.


15) Attach the chain to both ends. You can either use jump rings, or simply open up the loops with the pliers. You can also attach the chain to one end of the pendant, so that it hangs differently. It's totally up to you.


16) Attach a charm or tassel, if you'd like. 


Pretty easy! With some practice and playing around, you can create other words as well. 


Monday, April 28, 2014

How to Put a Background Picture in Your Tumblr Theme

Adding a background picture to your Tumblr can be a great way to make your blog look great and express your personality. These simple steps will teach you how to add any picture you want to your Tumblr background.
  1. Click on blog title.png
    Sign up or log in to your Tumblr. Go to your own blog by clicking on the title at the top of your dashboard.
  2. Customizetheme.png
    Click on "Customize theme" on the right side of the screen.
  3. Change background image.png
    Scroll down on the customization sidebar until you reach the "Background" section. Click on the "Upload" button.
  4. Select background image.png
    Select the image you wish to use for your background. It should be as large and as high-quality as possible, similar to the desktop background on your computer.
  5. Blog background save.png
    Save your changes. When you have selected an image as your new background, you will see a preview of your new theme. Make sure that it looks how you want, and then click the green "Save" button.
  6. Confirm your changes. After you click "Save", click "Close". This will take you back to your Dashboard page. Click on the name of your blog next to "Dashboard" at the top of the page. Then click "Open [name of your blog]" near the top right corner. This will show you your blog as it appears to other users. Make sure that your new background looks how you want it to.

    Screen shot 2012 07 30 at 1.38.27 PM.jpg

Monday, April 21, 2014

How to Remove an Application Off Your Twitter Account

Did you try this new application on Twitter and then realized that it was annoying for your followers? Maybe it kept tweeting weird stuff and sending weird DMs to others? Read on and you will know how to delete any applications that you do not want to keep in a second!
  1. Remove an Application Off Your Twitter Account Step 1 Version 2.jpg
    Log on to your Twitter account.
  2. Remove an Application Off Your Twitter Account Step 2 Version 2.jpg
    Look for the "gear" in the right-hand corner.
  3. Remove an Application Off Your Twitter Account Step 3.jpg
    Click on "Settings"
  4. Remove an Application Off Your Twitter Account Step 4 Version 2.jpg
    Go to "Apps"
  5. Remove an Application Off Your Twitter Account Step 5 Version 2.jpg
    Click on "Revoke Access" to remove the app that you want to stop accessing your Twitter account

Monday, April 14, 2014

How to Mark Your Direct Messages As Read on Twitter

Direct messages on Twitter can be sometimes very annoying if you get many of them. Marking them all as read at once can be a good way of removing them from your view without having to sift through each one.

  1. 1
    Sign in to your Twitter account. Type in your username and password.

    Twitter_step_1_974.png
  2. Send a Direct Message on Twitter Step 3.jpg
    2
    Click on the gear icon. You can find it on the top right of your homepage, to the right of your search bar.
  3. 3
    Select "Direct Messages." It's the first option from the top of the drop-down menu. A new window will pop up.

    Step_10_930.png
    • Alternatively, you can click on 'Me' and press the messages icon.
      Step_3_976.png
  4. Step_4_518.png
    4
    Click on the 'tick' icon. This means that you want to mark the direct messages as 'read'.
  5. Step_5_488.png
    5
    Once you do click on it, click on 'Mark all as read'.
  6. Step_6_254.png
    6
    Finished. When you done, you'll realize that there will be no more of the blue circles.
    • And, also your profile won't have a number next to the message icon.
      Step_7_977.png

Tuesday, April 8, 2014

Bunny Craft Ideas


  1. STEP 1

    Measure the width and length of the top of the headband, add 1/2 inch to all sides, and cut a strip of pink felt to cover.
     
  2. STEP 2

    Glue the felt strip onto the top of the headband, wrapping the extra material around the headband's edges.
     
  3. STEP 3

    Measure the underside of the headband, and cut a strip of pink felt to fit.
  4. STEP 4

    Glue the strip to the underside, creating a backing that covers the edges of the top felt.
     
  5. STEP 5

    Print out our bunny-ears template, and cut out both shapes.
  6. STEP 6

    Trace the outer-ear shape onto pink felt twice, and cut along scalloped edge (or cut out with pinking or scalloped shears).
     
  7. STEP 7

    Trace the inner-ear shape onto white felt twice, and cut out with regular scissors.
  8. STEP 8

    Glue each pair of ears together with hot glue, and let dry.
  9. STEP 9

    Crease each ear vertically down the middle, and press.
  10. STEP 10

    Fold up the bottom flaps on either side of the notch, and attach to headband with hot glue, pulling notches closed so ears are slightly bent. Hold until glue sets.

    (marthastewart)