Pages

Tuesday, June 3, 2014

5 Scrummy Bakes for Dad

Dads can be notoriously hard to buy for – especially when you’d rather be giving him something personal instead. These five easy bakes for dad can be quickly customised with his favourite toppings or ingredients. Plus, they’re all super simple to do – and perfect for baking beginners!


1. Shortbread

Father's Day Shortbread
Shortbread is a good bake to start with if your new to the world of baking – you don’t need a lot of ingredients or equipment to make something that both tastes and looks delicious!


2. Bread

5 Scrummy Bakes for Dad #dad #fathersday
This white loaf would make a great breakfast-in-bed treat. Cut it into thick slices with a healthy spread of butter and jam, for a delicious Father’s Day treat!


3. Flapjack

How to make Flapjack Step 6
Flapjack is a perennial bake for dad! This super simple, super sticky recipe is sure to become one of your family favourites.


4. Cookies

5 Scrummy Bakes for Dad #dad #fathersday

Cookies are a great bake for the kids to help with (and little fingers make light work!). All you need for these hand-crafted cookies are some cutters and Ready-Roll Icing!

Tuesday, May 27, 2014

Dad's token tin


Instead of the usual coupons, why not give dad some fun tokens this year. 

What you need:
*  small round tin (i got mine at michaels - it's about 4" in diameter)
*  one sheet of black cardstock
*  two or more sheets of white cardstock (depending on how many tokens you make)
*  sheet of tokens
*  black ink pad
*  scissors


Step one: print your tokens, then punch out with 3" punch.

Step two: trace and cut out white circles a little larger than your tokens. i used a large soup can. (you can probably use a cricut for this) then trace and cut out one black circle for the lid of your tin. this needs to be bigger than your white circle, but not bigger than the lid. 

Step three: ink the edges of your white circles. 


Step four: adhere tokens to your white circles. (adhere the black one for your lid) then have your child(ren) write things they are willing to do for their dad on the tokens. make sure to have them sign their names too.


Sunday, May 25, 2014

How to Add Closed Captions to YouTube Videos


YouTube has the ability to display closed captions and use those captions to translate into many different languages. This article explains how to upload an prepared caption file to YouTube.
Add Closed Captions to YouTube Videos Step 1 Version 2.jpg
  1. Log into your YouTube account.
Add Closed Captions to YouTube Videos Step 2 Version 2.jpg

  1. Go to the My Videos page and scroll down to the video you want to add captions to.
Add Closed Captions to YouTube Videos Step 3 Version 2.jpg

3. Look at the bottom of that section. You'll find a set of buttons (Play, Edit, Annotations, Captions, etc.) that are used to make changes to your video.
Add Closed Captions to YouTube Videos Step 4 Version 2.jpg

4. Click the "Captions" button.
Add Closed Captions to YouTube Videos Step 5 Version 2.jpg
5. Search for the "Available Caption Tracks" section. Click on the "Add New Captions and Transcript".
Add Closed Captions to YouTube Videos Step 6 Version 2.jpg

6. Browse for the file you downloaded. Select "caption file" as the file type, Make sure the language is in English, and click the "Upload file" button.
Add Closed Captions to YouTube Videos Step 7 Version 2.jpg
Now you'll see that there's English as an available track. Play the video to the left to see your captions in action.

The Best Place to Buy and Sell Handmade in the USA

Thursday, May 22, 2014

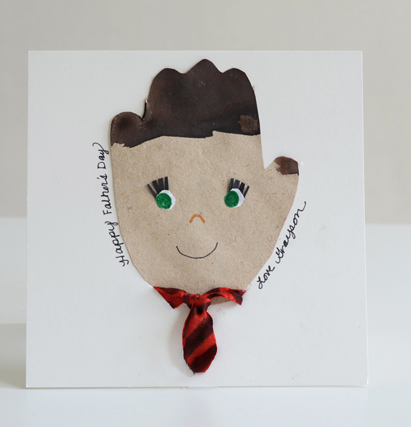
Make Father's Day Handprint Cards!


Supplies:
- Heavy card of white card stock with matching envelope
- Craft paper
- Pencil
- Scissors
- Glue
- Paint (we used watercolor but, any paint will work. If fact, you could use markers or crayon, too)
- Google Eyes
- Fabric Scraps
- Markers


How to make:
- To make this Handprint Card, we traced our youngest son's hand with his fingers held tightly together onto craft paper.
- We cut out handprint. 
- Decorated the handprint and attached to card.

Tuesday, May 13, 2014

Father’s Day : Printable Trophy Dad awards

What you can do for your father is awarding him a bunch of mini Trophy Dad awards.


On to Father’s Day – I still wanted to celebrate all the good little deeds my father does for us. So I came up with these little printable trophy awards for the kids to post around the house :)


Monday, May 12, 2014

How to Sign Up for Pinterest

Pinterest is an image-based social media site that allows you to share your cool things that you find across the web! This article helps you to signup for an account and get started.
  1. Signup for Pinterest Step 1.jpg

    Go to the Pinterest.com website. It's found at: http://www.pinterest.com. If you don't have an account already, click "Signup" on the home page. Check your email and click on the link that is sent to you to create an account. Alternatively, you can signup thru Facebook too.
  2. Signup for Pinterest Step 2.jpg

    Log in. You can log in with either Facebook or Twitter. Create a password to go with it.
  3. Signup for Pinterest Step 3.jpg

    Click on images or items that catch your interest. Then click on "Follow People." Doing this will get you started on the site.
  4. Signup for Pinterest Step 4.jpg

    Check out the people you're now following. You can unfollow later, if you choose.

Thursday, May 8, 2014

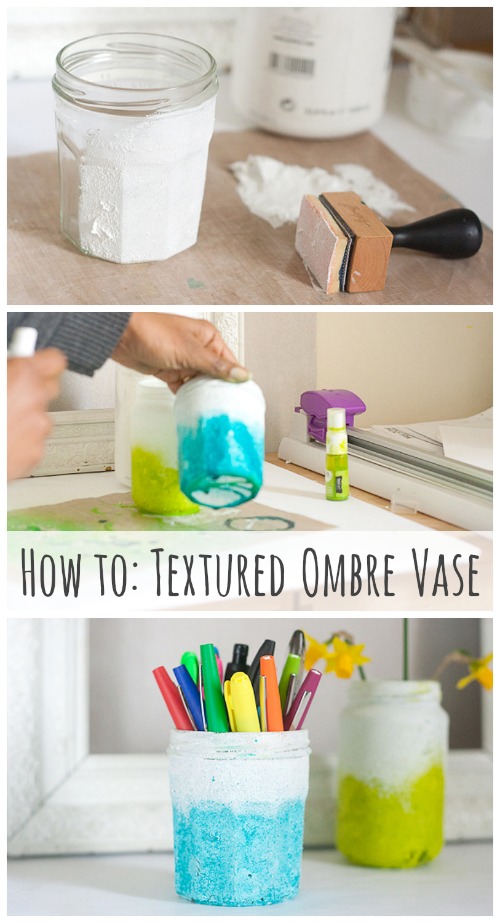
Make a Textured Ombre Pen Pot or Vase

My desk needs a bit of sprucing up. My big plan is to sand it completely to remove the stain, and then paint it white, or maybe yellow. In the mean time I decided to work on a smaller project to make my work area a bit more cheerful. I spend a lot of time sitting at my desk, so I wanted to have a cheery pop of colour there. I decided that a new pen pot would be just the thing! And while I was at it I made a vase too.

Textured Ombre Pen Cup and Vase
Supplies for a Textured Ombre Pen Pot:
  • Empty jam or mason jars. ( I always have a ton of these I keep, you?)
  • White gesso
  • Spray ink
  • A sponge dabber
  • Non-stick craft mat.
Textured Ombre Pen Cup and Vase Supplies
1. Measure out some white gesso onto your non-stick mat, and using the sponge dabber apply it all over the glass jars in a, well a dabbing motion
Textured Ombre Pen Cup and Vase Gesso
We’re going for texture here, so don’t worry too much about it going on evenly. Once the jars are completely covered, turn upside down to dry.
Textured Ombre Pen Cup and Vase Drying Gesso Texture
Luckily gesso dries pretty quickly, so it’s not a long wait!
2. Holding the jar by the rim, spray the ink on the lower part of the jar while turning it at the same time
Textured Ombre Pen Cup and Vase Container DIY

Textured Ombre Pen Cup and Vase DIY
This part is very unpredictable, so you have to be up for surprises! If you’d like a more even  edge, you can put some painter’s tape around the top part of the jar. To get deeper colours, you can apply several coats of the ink.
DIY Textured Ombre Pen Cup and Vase
Now wait to dry, and that’s it! Time to add pens and flowers
Textured Ombre Pen Cup Container
I love the weather beaten look of these, and the pen pot is the perfect touch for my somewhat drab desk.
Other Ideas
  • You could make these in a rainbow of colours for a themed event.
  • Or paint different shaped jars in the same colour for some uniformity.
  • Instead of spray ink, experiment with acrylic paints or washes.
Enjoy!
How-to Textured DIY Ombre Vase
Visit MyMisi for Amazing Handmade Creations!